Sunday, May 29, 2016

Creating a Photobook from a Blog or Social Network Page

This two hundred page photobook cost less than ten dollars to create

I wanted to have a book version of my family blog SeeTheKeysGrow. The blog has over a hundred posts however, and I knew printing out with a professional printing site would cost a pretty penny! When we got a laserjet black and white printer I decided to try and print one myself. I am happy to say it looks amazing!


Supplies:
  1. Copy paper
  2. Laserjet printer
  3. Book from the thrift store that is just a little larger than 8.5x11 inches
  4. Large (18x11 inch) piece of paper for the cover
  5. Scissors
  6. White Glue
  7. Stapler


  1. Go to your blog or social networking site and select print from the top right window's toolbar.
2. If printing a blog try checking the simplify page Option. It took all the computer setting and ads off my page. It didn't work so well for me with Facebook.


3. Select Custom setting under Margins heading on the same page.
    I brought my side margins in to 1.25 inches to allow for the book spine and make it look cleaner.


4. Now print your pages, but remember to print front and back (my printer didn't have this setting so I had to print odd pages and then turn them over and print the even pages on the other side) God bless you if you have to do this too.

5. Cut off the cover of your book by cutting between the end page and the cover.


There, now you have freed the book cover!


6. Carefully cut or tear the (always blank) end pages off the front and back of your coverless book. We will use these for endpapers.


7. Put a blank page at the front and back of your printed pages.


8. Add the end pages you tore off to the front and back of your stack of pages. 

9. Divide your pages into staple-able groups. Stack each group evenly. 


10. Staple 4-5 staples on the very far left side of each stack.

11. Glue along your stapled edge on each stack. Put stacks together in order.
Now you have your book pages!

12. Glue the inside of the spine.


Ok, that's not enough glue now pour on some more!


13. Stack your bookpages carefully and then place inside the cover.


14. Glue your the endpaper in your cover to the endpaper in your photobook.


Make sure the pages are pressed into the glue.


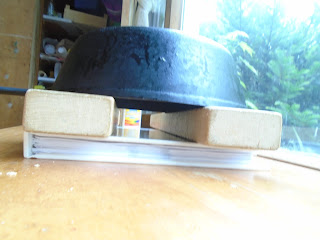
14. Put a larger book (I used a board) on top of your closed cover, just beside the spine.- and counting is not my strong suit.

15. Put something heavy on top to press.


Now to make a jacket for your naked, still wet book.


 16. Fold out your old jacket, and use to trace onto your large sheet of paper. 

18. Let your book dry for a couple of days. (Or if you are me get impatient and go ahead and throw caution to the wind and put your cover on a still drying book).

17.  Line up spine in the middle of the jacket and fold jacket over the cover. (Again Allison's counting =bad)


But Allison's book=Beautiful!


This will be the first of many! If you created a photobook please share a picture in the comments below.

Christmas Decorating Ideas

Next year remind me not to show the kids the tree till it is fully arranged and lit.  I forget how many times children say, "Can we put the ornaments on NOW?". I even had them put the tree together this year by themselves, yet waiting for me to finish the lights was apparently torture!  

Next year I am going to cover the whole thing in saran wrap as seen here like my friend Monica suggested, lights and all, to save the hours of ornament questions. Sorry to whine, but we three have been fighting the whines all day, How do we fight the whines?; by beating it over the head with TOGETHERNESS and JOY DAD GUM IT! 

Dorathea took a rare and much needed two hour nap and when she a woke, WA LA, the tree was lit and ready for ornaments!


I bought receipt tape (from an office supply store) and use it every now and then to write verses to stick on my walls.  I need to keep certain beautiful words around me.  I liked this trend of using "Happy Holidays" ribbon as a tree garland, so I wrote out "Glory to God in the Highest and Peace on Earth Goodwill to Men".  I like it!

 Dorathea is holding an ornament of her baby photo.  
 These two have reached a new milestone; I didn't have to rearrange the ornaments after they put them on the tree!  They have learned how to evenly distribute them!  Its the small parenting victories that make me happy.
 The larger lights are ping pong balls placed on the lights.  I saw this pin 
and picked up a pack of 10 ping pong balls at the Dollar Tree. I slit a hole in them with a knife and just stuck them on 

I hosted a baby shower this weekend and wrote the Wordsworth poem below on the mirror with dry erase marker. I'm not ready to erase it yet.


The box below is another Pinterest find. I just placed the tree base in a stack of bricks inside the planter. 

This chalk art was for the party as well and is from this pin.


  I am in love with them, even if I whine about their whining.  I love that my family just enjoyed throwing two parties with me last week, and then happily helped me host my Dad and brother overnight last night. Sometimes it's the quieter hours at home that are harder.  Right now the house is quiet and peace has won the day.  I love my job even if it's hard and sometimes whiney,

-Allison

Children's Slide and Curtained Bunk Beds


I have been busy making spaces for thriving children.  I am no where near finished (I never am), but I've carved out a few pretty spots I want to share.  

First of all the kid's room;
I removed the slide tower from our old swingset, and painted the tower white.  I fastened it to their bunkbed and viola, free castle-bed!   

Then I put 4 c hooks up on either side of the bunks and strung wire from one to the other.  I strung up some cafe curtian rings onto the wire.  Cafe rings are brass, really inexpensive (around 2$ for 12), and can be found in your local retail store.  Next I clipped my ikea curtians up lengthways onto the curtian rings (the stripes are really supposed to go up and down).  

If the kids try to swing from thier curtians the rings will loose thier grip and the curtains will fall.  I figure it's better for the curtain to fall then the hooks to pull out of the wood or wall, or the wire to break.  This way I told them if the curtian falls because they yank on them, they can do a chore so I will reattach it.  Also if I need to wash the curtains I can just unclip them.  
The kids are now calling me the "coolest mom ever" for pulling off this new bed and Dorathea wants to hold a cool kid's room contest because she is sure will win.  They both love the privacy of the curtians as well as the fun of the playground equipment.  Doesn't every kid need a place to hide?


Most of the time I am loosing my kids to the backyard.

Remember the post on my personal blog about our move here?  I asked for a lot of things, space, a studio garage, full grown fruit trees that God answered with this house. Go here to read about how we got here; http://countingthedaysofgratitude.blogspot.com/2012/04/song-of-bird-sitting-on-top-of-her-cage.html  

Well these blatent answers to prays just keep happening.  I was thinking it would be nice to plant some blueberry bushes, and what to you know, there was a giant blueberry bush I hadn't seen!  
I told Ted we should look for a dinner bell to call the kids from all the hidden places in the yard, and vioala!  Their was a dinner bell on the back porch.  
.
I have always asked God for place for the kids to hide, a playhouse maybe in the yard.  I think being outside is the best way for kids to organically grow up loving God and feeling peaceful.  
Well, There is the circle of giant rocks hidden away for adventurers to climb on, 
An overgown cedar bush by the house that Dorathea calls her "Hangout", and 
some lovely apple trees that make a great perch, and 
A mud puddle that the kids have made a "mud restaurant" out of.  
sitting in her bush "hang out"


Here they are having tea a teddy bear's birthday.

"Toast!", with peppermint tea.


I am loving watching this yard unfold each season of flowers fruits and surprises.  

So thank you to the God who hears my prayers!

Next post will hopefully be of the rest of the house.  I can't wait to show you!

Peace to you and your home too!
Allison

Valentines, with a free Valentine printable!

We had several "talks" about complaining in our house today, even before breakfast.  Talks about not complaining about breakfast, school, really everything.  Moans, groans and tears ruled until we started school (but then many groans about starting school).  Groans stopped when Dorathea read an adorable book aloud called, "Pippa Mouse". 

I love to hear her read, she has her Daddy's speaking voice, but lately has been asking to read "in her head" instead of aloud.  No complaining during Pippa and then onto our writing work today; Valentines.  Valentines sent us far away from complaining land into thankful land.  

Today we were making valentines for far away family to send in the mail.  I love how loving others changes our perspective instantly.  Pretty stationary helps too.
I let Dorathea go freestyle.  My only restriction was to use only one color; red.  She chose some old, tiny stationary paper I found at the thrift store and went to work while I helped Jonathan with some cards I had printed out for him.  

I wrote  xoxo  love J  in pencil.  He traced the letters in red marker which looked like this;


I designed and printed them last night.  Do you like them?  My Grandmother (who will be receiving one) used to sing this song to me when I was little.  I am including the original for the cards here:  
If you want to make your own cards just right click your mouse then select copy image and paste into a Microsoft Word.  Make sure your document is landscape (wide instead of tall) so that you can fold it in half and make the image the right size for the paper.   I used a pastel papers to print mine on.
Happy Valentines Day from the Keys!

 I explained that x's and o's stood for hugs and kisses to Jonathan and he grinned and said "I send them hugs!".  He is so sweet and such a cuddler, he totally got the concept.  Of course after these instructions instead of tracing he made a map island  in the inside of the first card.  I guess the penciled x looked like it would make  a better treasure map?  The second third and fourth ones were better :).
 And then when I turned away he decided his valentines and his hands needed spots.
Meanwhile,

Back to the little girl...
She was already finding envelopes and sealing hers up.  And low and behold they looked really cute!

 We had a quick lesson on addressing an envelope, which I ended up doing most of

Then off to the mail box she went!  I think I'll send Jonathan's tomorrow.  Let's spread out the love over a couple days.

Then we did PE; rollerskating.  Trying out new rollerskates and falling down a lot.
More Valentine's to come!  Happy February to you all- Allison